Showing posts with label crafts. Show all posts

Friday, September 16, 2016

Crochet a Cheeseburger - Handmade Pot Holders Tutorial


Free Pattern to Crochet a Set of "Cheeseburger" Potholders for Summertime Grilling, Fall Football Tailgating, or Anytime!


I love to crochet and enjoy sharing with fellow fiber art crafters. Here is a free pattern to create five unique potholders and/or sturdy hot pads that -- when stacked together -- look like a cheeseburger! Perfect for summertime grilling, for camp cookouts, or for tailgating at sporting events.

Dress up your kitchen or store in your camper for all your summertime cooking with these fool-the-eye pot holders! Put on your kitchen shelf next to your stove for a conversation piece all year round. Easy to crochet with these simple directions.

*All photographs of crocheted cheeseburger potholders on this page are the property of (c) Wednesday Elf.


Cheeseburger Potholders in Crochet 

- A Novelty Item that is also Practical and Useful


Cheeseburger Potholders Set of Five
Set of Five Novelty Potholders

An easy pattern to crochet-for-the-kitchen (or patio). Each potholder is crocheted double-thick for extra protection. I used acrylic yarn for it's ease of handling and the fact that it is easily machine washable & dryable, but cotton yarn can also be used. This particular set I call a 'Cheeseburger' potholder can be varied with less or more pieces (leave off the cheese potholder and you have a 'hamburger' or add a green round potholder for 'lettuce'). The set shown here consists of five pieces -- top and bottom buns, hamburger, cheese slice and tomato slice. All potholders except the cheese slice are done in single crochet in the round and are quite simple to do, so it becomes a good 'take-along' project for busy crafters.


*Each potholder begins with a Basic Round listed below, with variations for individual pieces described later down the page.


Materials:


  • Worsted-weight (4-ply) yarn: about 1-1/2 oz. beige or tan, 1 oz each of white, brown, yellow, orange and red.
  • G/6 Crochet Hook
  • Yarn Needle

Crochet Abbreviations Used in this Pattern

 
ch = chain
sc = single crochet
Rnd - round
sts - stitches


BASIC ROUND


NOTE: Bun top and bottom potholders, and Hamburger potholder are each made from this Basic Round. Make in brown for hamburger, in tan and white for bun.


  • Rnd 1: ch 2, 6 sc in second ch from hook (6) [Do not join rounds]
  • Rnd 2: 2 sc in each sc around (12)
  • Rnd 3: (sc in next sc, 2 sc in next sc) around. (18)
  • Rnd 4: (sc in next 2 sc, 2 sc in next sc) around. (24)
  • Rnd 5: (sc in next 3 sc, 2 sc in next sc) around. (30)
  • Rnd 6: (sc in next 4 sc, 2 sc in next sc) around. (36)
  • Rnd 7: (sc in next 5 sc, 2 sc in next sc) around. (42)
  • Rnd 8: (sc in next 6 sc, 2 sc in next sc) around (48)
  • Rnd 9: (sc in next 7 sc, 2 sc in next sc) around. (54)
  • Rnd 10: (sc in next 8 sc, 2 sc in next sc) around. (60)
  • Rnd 11: (sc in next 9 sc, 2 sc in next sc) around. (66)
  • Rnd 12: (sc in next 10 sc, 2 sc in next sc) around. (72)


Cheeseburger Potholder Bun Top and Bottom
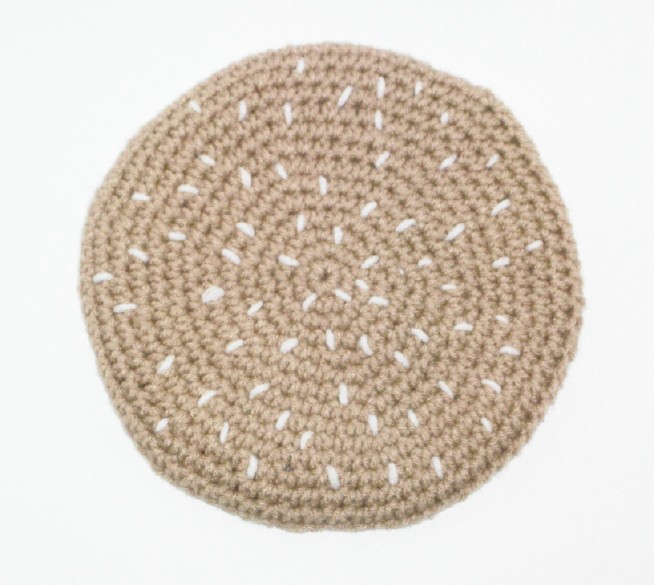

Crocheted Cheeseburger Potholder Set - Bun Top
Bun Top

Hamburger Bun Top with Seeds

  • Rnds 1-12: With tan or beige, make Basic Round through Rnd 12.
  • Rnds 13-15: Sc in each sc, fasten off yarn at end of Rnd 15.

Scatter seeds over top of bun by making 25 to 30 short stitches at random with white yarn and tapestry needle.

*White yarn is used for the inside of the hamburger bun and for the 'seeds' on the top bun.


View of the Inside of Top & Bottom Buns


Cheeseburger Bun in Crochet Potholder
Inside top and bottom bun

Crochet Inside Piece in White for Top and Bottom Bun Potholders

Make Basic Round in white, cut and fasten off at end of Rnd 12.

With tan yarn, sew inside of bun to bun top.


Cheeseburger Potholder Bun Bottom


Cheeseburger Potholder Crochet Tutorial
Cheeseburger Bun Bottom

Bun Bottom Potholder

With tan yarn, repeat Bun Top through Rnd 14.

Repeat Inside of Bun Top with white.


Red Heart Super Saver Yarn, BuffRed Heart Super Saver Yarn, BuffCheck Price Sew two pieces together with tan yarn


Red Heart Yarn, Tan.

Tan yarn is needed for both top and bottom buns.


Hamburger Potholder - If you prefer, you can make this into a 'Veggie' burger! :)


Hamburger Potholder in Crochet
Hamburger Potholder

 
Hamburger Potholder Instructions (Make 2)


  • Rnds 1-12: With brown yarn, make Basic Round through Rnd 12.
  • Rnd 13: Sc in each sc around, fasten off.

Make a second piece through Rnd 12, fasten off.

Sew two sides together with right sides facing, wrong sides out.
 

Red Heart Soft Yarn, ChocolateRed Heart Soft Yarn, ChocolateCheck Price
Red Heat Soft Yarn in Chocolate.

Dark brown yarn, like this Red Heart yarn in chocolate, is used for the hamburger patty.


Cheese Slice Potholder


Cheese Slice for Crocheted Cheeseburger Potholder Set
Cheese Slice Potholder


Cheese Slice Potholder is a Square!

The cheese slice is worked around the starting chain, making the front and back at the same time, then closing the top with a row of single crochet.

NOTE: Since rounds have a tendency to veer to the right (or left, if you crochet left-handed like me), stop every few rounds and pull work to the left (right) until stitches seem to be straight up and down.
Instructions:


  • Rnd 1: With Yellow, ch 24, sc in 3rd chain from hook (turning chain counts as 1 sc), sc in next 20 ch, 3 sc in end ch, turn, working back side of chain, sc in next 21 ch, mark end of Rnd. (46 sc).
  • Rnds 2-24 (or until piece is square): Sc in each sc around.
  • Rnd 25: Holding both sides together, sc across top to close, fasten off.


Different Yellows for Different Cheeses...

Bright Yellow Red Heart Super Saver Economy Yarn

RED HEART Super Saver Yarn, Bright YellowRED HEART Super Saver Yarn, Bright YellowCheck Price

Use a bright yellow yarn for your standard American cheese slice. If you want to get fancy, use a light yellow yarn 
for a different kind of cheese. In crochet, you can create anything you can imagine. :)


Tomato Slice Potholder


Tomato Slice Potholder for Crocheted Cheeseburger Potholder Set
Tomato Slice Potholder

The seed effect of the tomato slice is made by bringing the hook through from the wrong side and working sc (reverse sts) with 2 regular sc separating each seed section. Each round is increased 6 sc as in the Basic Round, with increases always worked in the reverse sts (seed section) after Rnd 3 is completed.


Tomato Slice Potholder Instructions with Seed Stitch
  • Rnd 1: With Red, ch 2, 6 sc in 2nd ch from hook, do not join rnds.
  • Rnd 2: 2 sc in each sc around.
  • Rnd 3: *2 sc in next st, reverse sc in next st, repeat from * around (start of seed pattern).
  • Rnd 4: *Sc in next 2 sc, 2 reverse sc in reverse sc, repeat from * around.
  • Rnds 5-10: From here on, sc in each sc, reverse sc in each reverse sc, increasing 1 reverse sc in each seed section, or 6 increases per round (60 sts at end of Rnd 10).
  • Rnds 11 & 12: Sc in each st., increase 6 sts each rnd.
  • Rnd 13: Working back loop only, sc in each sc around, cut yarn and fasten off.

To finish: Make two pieces and sew together through both loops of Rnd 13 on first piece and through back loop of Rnd 12 on second piece


MY PERSONAL NOTE: If you want to keep this pattern simple throughout and don't want to fuss with learning a new technique, just crochet the tomato slice in the Basic Round through Rnd 12.

RED HEART Soft Yarn, Really RedRED HEART Soft Yarn, Really RedCheck Price

Red Heart Soft Yarn, Really Red


Red yarn is used for the tomato slice potholder.


FINISHING


Stack hamburger, cheese and tomato slice between two bun halves


Cheeseburger Potholder Crochet Tutorial
Cheeseburger Potholder Set of Five


Crocheted Cheeseburger Potholders - Set of 5. Or -- a 'calorie-free' Cheeseburger :)


A 'Made for You' Set!


If you don't crochet, or don't have time to make your own set of Cheeseburger Potholders, a ready-made set handmade by me can be purchased through my Etsy Shop, Coastal Crochet Crafts. At the moment, the last set has sold, but a new set can be made upon request just for you by sending me a convo at my Etsy Shop's site. :) 


September 18th... 

is National Cheeseburger Day!  


This set of Cheeseburger Design Potholders would fit in perfectly when grilling your cheeseburgers on this... and 'any' day!


Novelty Potholders Make Fun Conversation Starters. Fill Your Crafting with some Fun. 


*Tutorial originally published on 6/2/2012
on another site


Note: The author may receive a commission from purchases made using links found in this article. “As an Amazon Associate I earn from qualifying purchases.”

Thursday, February 18, 2016

Coastal Crochet Crafts on Etsy


My Etsy Shop is Called Coastal Crochet Crafts!


It First Began as Mountainside Crochet
 
Baby Harp Seal

Mountainside Crochet became my online presence in 2008 when I first opened my Etsy Shop. I chose the name for my shop using two criteria - my specialty and my location. I am a crochet crafter and the shop would feature my crocheted creations, so I needed to use 'crochet' as part of my shop name. There are numerous shops on Etsy in this fiber craft, so I wanted to add something to the word 'crochet' to distinguish myself from the others. I decided to pick my location. Since we are limited to 20 characters in the name, it had to be something that fit. At the time, I was living on the 'side' of Stumphouse Mountain on the edge of the Blue Ridge mountains in western South Carolina, thereby "creating crafts while living in the mountains." Well, MountainsideCrochet was 19 characters, so that fit exactly in the length criteria, and also would tell everyone Who and What my Etsy shop was about.

Then, a bit later, I moved to the Georgia Coast outside Savannah and lived near the beach, Thus, the name with 'Mountainside' in it was no longer apropos. Therefore, I changed my Etsy Shop name to Coastal Crochet Crafts. Welcome!


Look, Before you Leap!


Pixabay
It's Best to Learn What You're Doing First!

It is wise, before beginning a new venture, particularly one that involves doing something you've never done before, to do your research and know something about what you are about to do. Well, not only did I not know anything about opening a craft shop on Etsy - or doing anything harder than sending emails on the computer - I did NOT do any real research. Oh, I read the how-to on Etsy about setting up your shop. That seemed enough, so I began. Boy, did I have a lot to learn, and learn I did, the Hard Way!

Trials and Tribulations of a Non-Technical Person!


First, I'd never used a digital camera before, and my photography over the years had left a lot to be desired (I tended to cut off people's heads all the time). I read the instructions for the camera and took several pictures and even figured out how to transfer them to my computer. OK, so far!

Source: Pixabay
After creating my shop account on Etsy, I started out to list my first item. There were 5 pages to complete, including title and description, category and tag words, price and shipping information. (Now it's a simplified form all on one page) When I came to Step 4: Upload photos. I clicked on the browse button, found my first photo on my computer, and clicked the upload button. At the time, I was using 'dial-up', so expected this to take awhile, but I waited.... and waited... and nothing happened. Being unsure what I was doing, I figured I'd done something wrong, so started all over. More waiting..... nothing happened except a blank screen! After 5 or 6 attempts, I emailed Etsy Admin and asked why it wasn't working. They replied with 'what size did you resize your photos to, because if the picture is too big, it won't upload'. Resize? I have to resize?  

My next step was to learn to resize each picture in the program that came with my digital camera. Once that was accomplished, the pictures uploaded just fine! Duh!


A Guide to Selling on Etsy is Very Helpful


Starting an Etsy Business For DummiesStarting an Etsy Business For DummiesCheck Price It would have been most helpful if ~ before I began setting up my Etsy Shop ~ I had read a guide to the basics.  A list of hints on how to set up an Etsy shop, including writing item descriptions, taking photographs of my work, and understanding the 'ins' and 'outs' of fees, shipping, packaging, etc. would have saved me much frustration as I learned to be an Etsy seller.  This book on "Starting an Etsy Business (for Dummies)" (and 'newbies' like me) would have been the perfect guide at the start.


Plush Baby Bear in Green


Plush Baby Bear
Plush Baby Bear in Crochet

Very First Shop Listing

My very first listing in my new Etsy Shop was a cute little baby teddy bear.  The fun part of crocheting stuffed animals is you can make them in any color you want. Sometimes I use a traditional color, like brown for a bear, but other times the more colorful the better. Babies, especially, like bright colors and pastel colors.

Over the years I've made over two dozen of these baby teddy bears for family and friends. It's a fun pattern I found in the May/June 1989 issue of Crochet World. The pattern was titled simply "Baby Bear" and was written by Sheila Leslie.

The last green 'Baby Bear with Bib' I made now lives with a friend's cute granddaughter in Florida. The latest one in my shop was crocheted in a variegated pastel called 'Fiesta', and is found below:
 
Crocheted Baby Teddy Bear
Baby Bear can be requested in any color you want. Just contact me at my Etsy Shop. 

Meanwhile, many other teddy bears and other kinds of bears, are currently living in my Etsy Shop.


My First Sale


A ballerina hippo plush toy handmade in crochet
Holly Hippo Ballerina

Two weeks after opening my Etsy Shop, I received an email stating I had SOLD an item. I could barely contain my excitement! The email from Etsy also stated that the customer had paid by PayPal and, according to the directions, I should now have a 2nd email confirming the PayPal payment. I waited a couple hours, but no second email arrived. Naturally I thought I had done something wrong with setting up the PayPal account, so I contacted PayPal. They researched my account, told me it was correctly set up, but that no payment had arrived. Well, I didn't know what to do next.

In the email from Etsy, we are given a mailing address for shipping the sold item, plus the customer's email for contact. I sent the customer an email about how I would ship the item as soon as I received payment and to confirm that she paid with PayPal. Nothing. No reply. The order had come in late Friday and now it was the weekend. The customer appeared to have an email address that seemed to reflect a business, so I did an online search and found her business in Colorado. This made me think that perhaps she had ordered from work and wouldn't get my follow up email until she returned to work on Monday. So I made myself relax and wait out the weekend.

It turned out the customer was new to online shopping, and didn't know how to complete a PayPal transaction. New shopkeeper + new online customer = "the blind leading the blind!" We got it all worked out and she was delighted with her hippo, as that is what she collects in all shapes and forms! The next sale went much more smoothly.


Where the Designs & Patterns Come From...


Handmade Plush Penguins on Etsy
A Penguin Colony in Colorful Plush Crochet

For my Crocheted 'Critters'


I have been creating crocheted 'critters' for more than 40 years, so many of the patterns I use are now considered 'vintage'. Some came from crochet magazines I subscribed to many years ago; others from even older issues accumulated from friends and thrift stores over time. 

Today, many free crochet patterns can be found online at various crochet-related websites and blogs.


My Crochet Creating is Expanding...


I Discovered the Amigurumi Style!
 
The Amigurumi Style of crochet (and knitting) is the Japanese art of knitting or crocheting small stuffed animals and anthropomorphic creatures. After about a year of crocheting my standard plush animals, I began seeing many creations on Etsy called Amigurumi. At first I thought they looked 'silly' - big heads.... small bodies.... skinny arms & legs. THEN, I tried one... this little Amigurumi Bunny... and 'fell in love'. It turned out so cute! Since then I have used the basic design to create my own Amigurumi designs.


If you are a crochet crafter like me, you might like to try this Amigurumi-Style of crochet. My favorite Amigurumi is in the form of cute little animals and this book, Animal Amigurumi to Crochet is a fun way to begin. 
The book includes patterns to crochet eight animals ( a bear, bunny, cat, dog, elephant, giraffe, hippo, and a monkey). There are also instructions on how to assemble the animals and tips on crochet and Amigurumi techniques. The finished dolls range in size from 12 to 18 inches tall.


Feedback is Fun!


I love getting emails and feedback from my customers. I find it so delightful to learn why they selected my item. The stories are so interesting and have made me realize that the item I chose to create was exactly what someone was looking for. I do not usually follow a trend and only occasionally crochet something 'holiday-related'. Most of the time I make what appeals to me and when I discover why something appeals to a customer, I work around that idea to come up with more items in that theme. But most of my themes come first from my own interests and those I've learned are favorites from my three children and now my five grandsons, who have all been recipients of my crocheted critters over the years! 

We will expand on those interests and themes, such as the seashore, nature, and farm & zoo animals in future crochet stories. 


Many of my Crocheted Critters Have New Homes...


A Happy Customer
In the 18 years I have had my crochet shop on Etsy, my 'crocheted critters' have found new homes in a wide variety of different states.

They now reside in locations from California to New York and Wisconsin to Florida. It's such fun 'tracking' my sales! I have a map of the United States posted on my bulletin board and put colored stickers on the locations where my little creations now live.

My very first international sale was a Red Letter day, and a new learning experience filling out the international customs form! A little green baby octopus now lives in Switzerland! Then a plush tiger traveled to Canada. And this picture shows a happy little girl in Scotland with her new plush penguin. But the longest journey any of my 'critters' has made happened in August 2012, when two plush animals went to Australia!

My Crocheted Creations and I Thank You for Visiting Us


crocheted handmade octopus toys
A Collection of
Crocheted Octopus

Thank you for visiting the story of my crochet shop, Coastal Crochet Crafts. Come visit anytime in my land of crochet where my cute critters romp & play.  Our doors are always open.


(c) Wednesday Elf.  Article written on 2/18/2015. updated 8/25/2026


Note: The author may receive a commission from purchases made using links found in this article. “As an Amazon Associate I earn from qualifying purchases.”

Wednesday, April 29, 2015

Crafty and Cuddly Mallard Ducks

Mallard Duck
Mallard Duck

Mallard Ducks are the most abundant duck species on earth.  The male Mallard is very distinctive with his green head and yellow beak.  Because they are so familiar and the easiest to identify, these ducks seem to be quite popular as decorative and useful home décor and fun plush toys.


Mallard Ducks on a Coffee Cup


Mallard Duck Mug
Early Spring Mallard Duck Mug by Plutonium Shores on Zazzle
Start your day with a Mallard duck by drinking  your morning coffee or tea in this attractive coffee mug featuring a photo of a pair of Mallards, the male and the female, entitled Early Spring Mallard Ducks.

Mallard Duck coffee mug features artwork designed by Plutonium Shores and is available in her Zazzle Store.


Handmade Mallard Duck Beverage Coasters


Mallard Duck Beverage Coasters
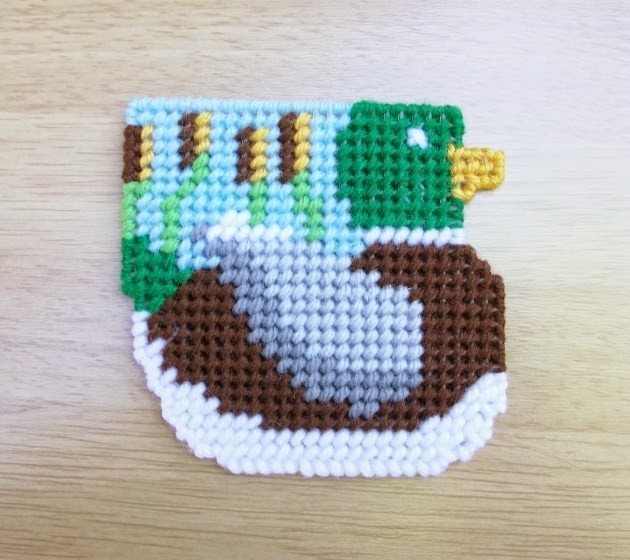
Mallard Duck Design Handmade Beverage Coasters
Need a coaster for your coffee mug?  This unique and pretty set of handmade beverage coasters is stitched in the colors and design of a Mallard Duck.  The set will be especially popular with the sportsman in your life or simply as a design that appeals to men.  Use them in the den or that  'man-cave'.  A perfect gift for dad for Father's Day or his birthday.

This is a set of 4 drink coasters shaped like a Mallard Duck. Each coaster measures 4 x 4 inches at their widest  and were created using plastic canvas and acrylic yarn in shades of gray, green, brown, blue, gold and white. The coaster set is available in the Etsy Shop of Coastal Crochet Crafts. 


Cuddly Plush Mallard Duck


Plush Toy Mallard Duck on Amazon
This plush Mallard Duck by Wild Republic will be a winner with children or any bird enthusiast.   It measures 5 x 3 x 5 inches and has details provided by the National Audubon Society, Inc.  It also features an authentic mallard call.  Plush cute Mallard Duck is available on Amazon.

Quack, quack – that's Mallard Duck talk for “hope you enjoyed this review of cuddly and crafty Mallards.”


Note: The author may receive a commission from purchases made using links found in this article. “As an Amazon Associate I earn from qualifying purchases.”